
What you will learn in this guide. This guide walks you through creating a course from scratch on Testkart, starting the course, building out your chapters and lessons, setting pricing and exam tags, and submitting it for review so it goes live for students.
Who this is for. Any teacher setting up a new course for the first time.
In this article:
Start a New Course
Describe Your Course with AI
Build Your Course Content
Set Price, Level, and Exam Tags
Complete the Checklist and Submit
After Submitting
Frequently Asked Questions
Start a New Course
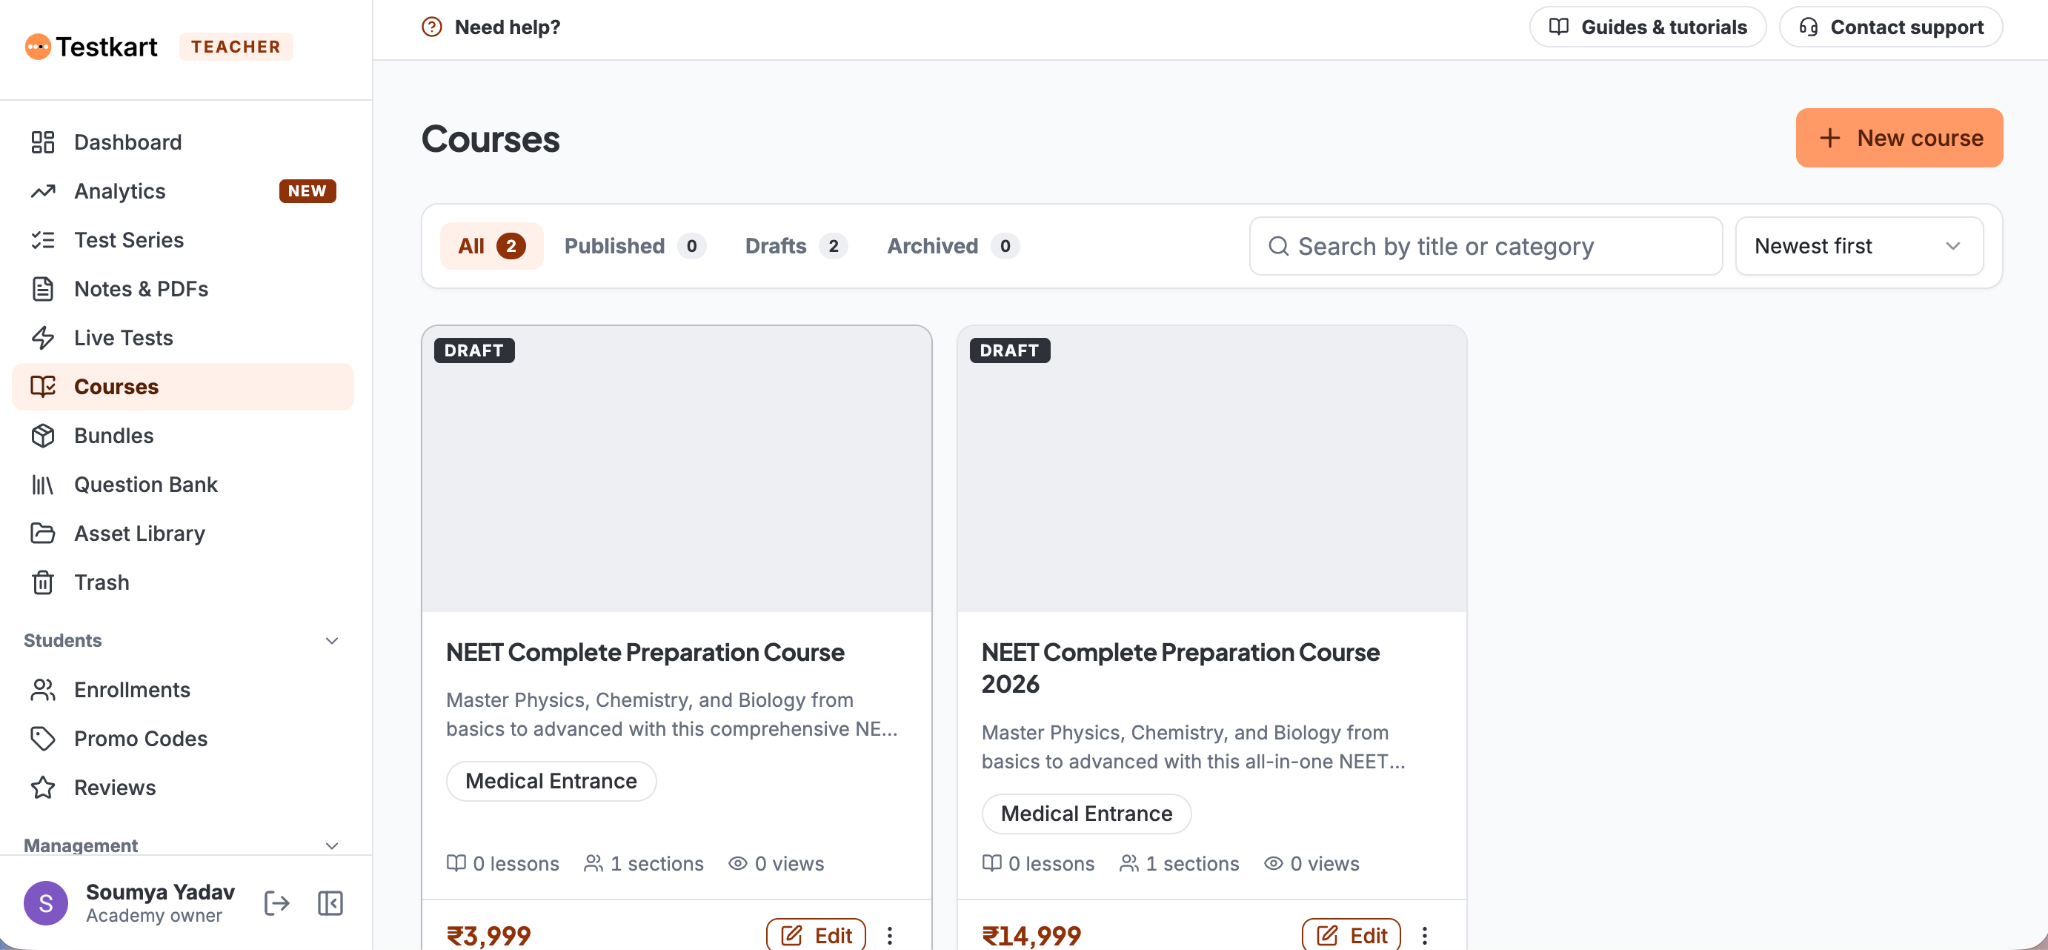
Go to Courses in the sidebar. This page shows all your courses, split into All, Published, Drafts, and Archived tabs. Click + New course in the top-right corner.
Describe Your Course with AI
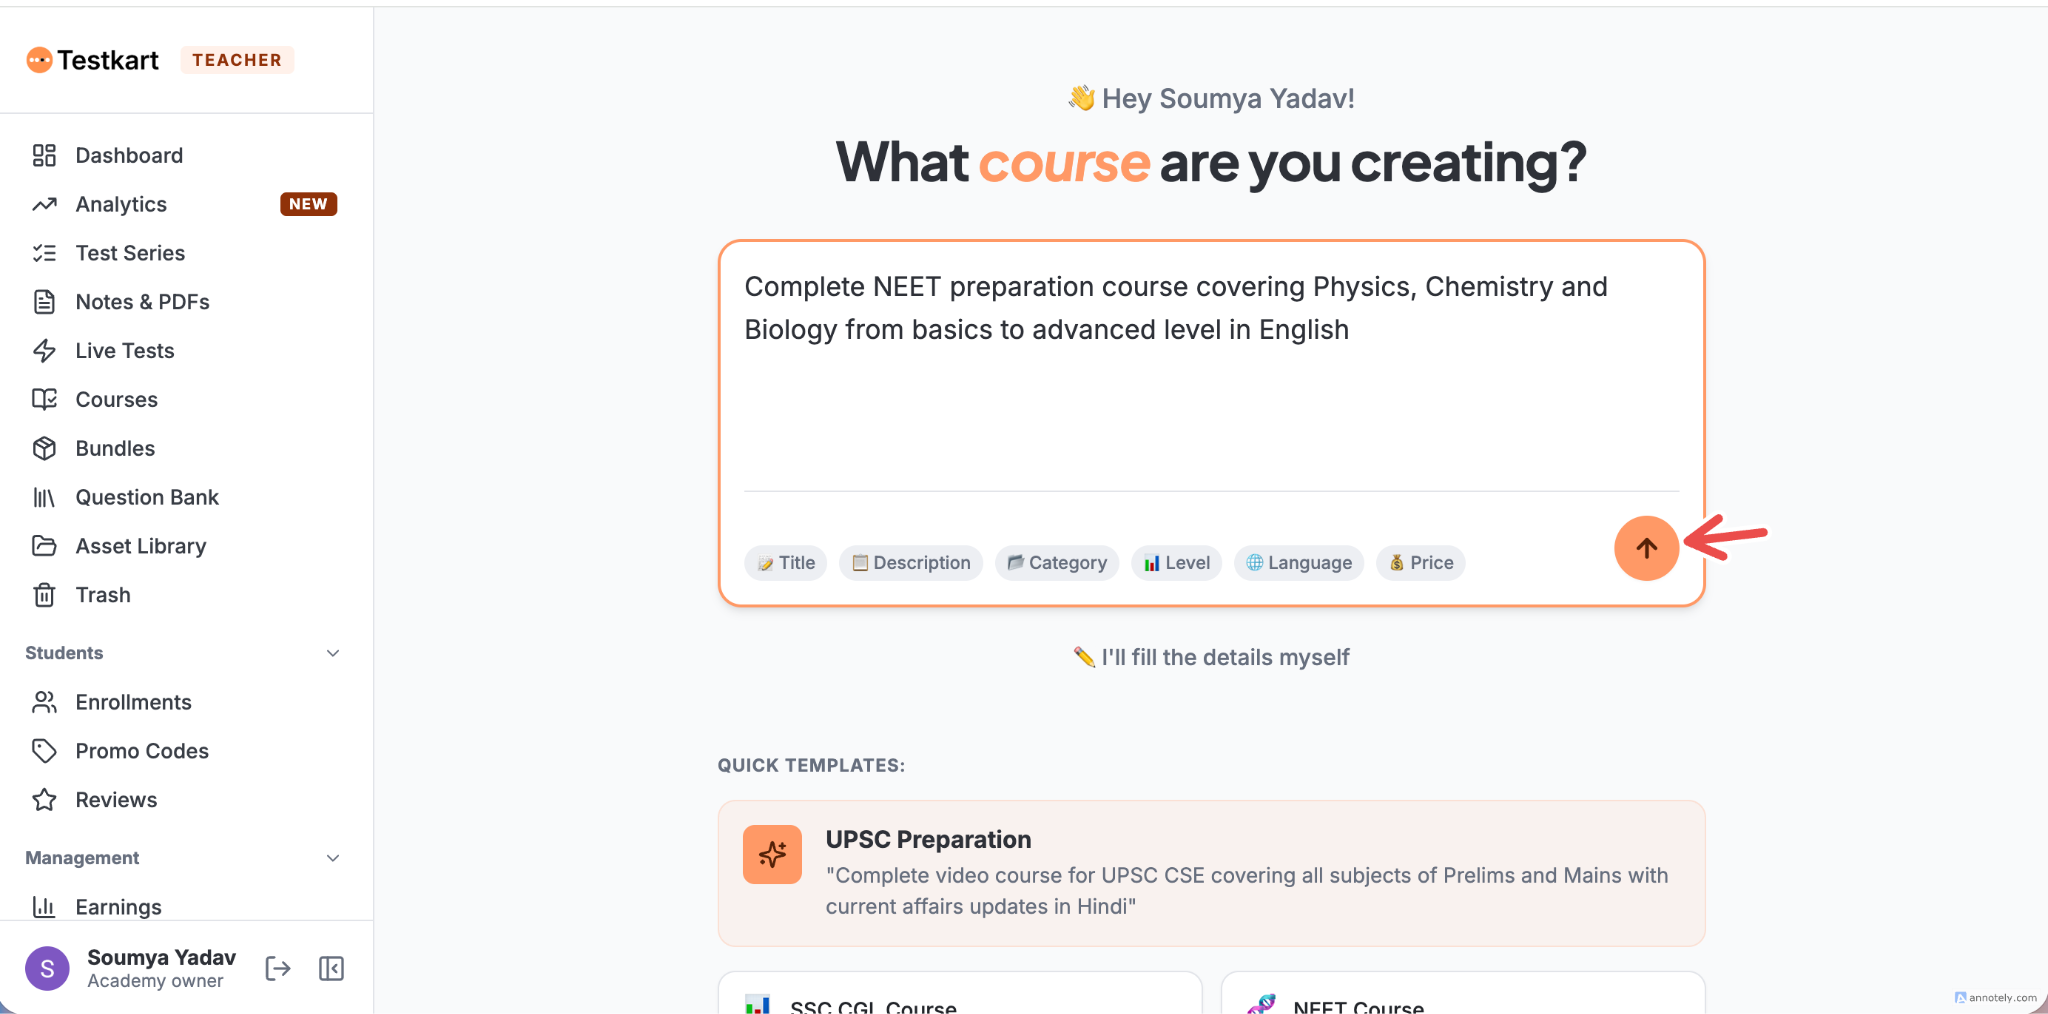
Instead of a blank form, Testkart asks"What course are you creating?"
Describe it in plain language for example, "Complete NEET preparation course covering Physics, Chemistry and Biology from basics to advanced level in English" and Testkart's AI generates the Title, Description, Category, Level, Language, and Price for you.
If you'd rather not use AI, click "I'll fill in the details myself" below the box, or pick one of the Quick Templates (like UPSC Preparation, SSC CGL Course, or NEET Course).
Build Your Course Content
Once your course is created, you land on its workspace with two tabs Content and Details.
On the Content tab, your course is organised into chapters, and each chapter holds one or more lessons. To add a lesson to a chapter, click + Add lesson and choose a type: Video, PDF, Text, or Quiz.
Add from Library.
Instead of uploading a fresh file every time, click Add from library to reuse a video, PDF, or other asset you've already uploaded elsewhere on Testkart pulled from your Asset Library in the sidebar. This saves you from uploading the same file twice if you're reusing content across courses.
To add more chapters, type a name in the Add a chapter field and click + Add chapter.
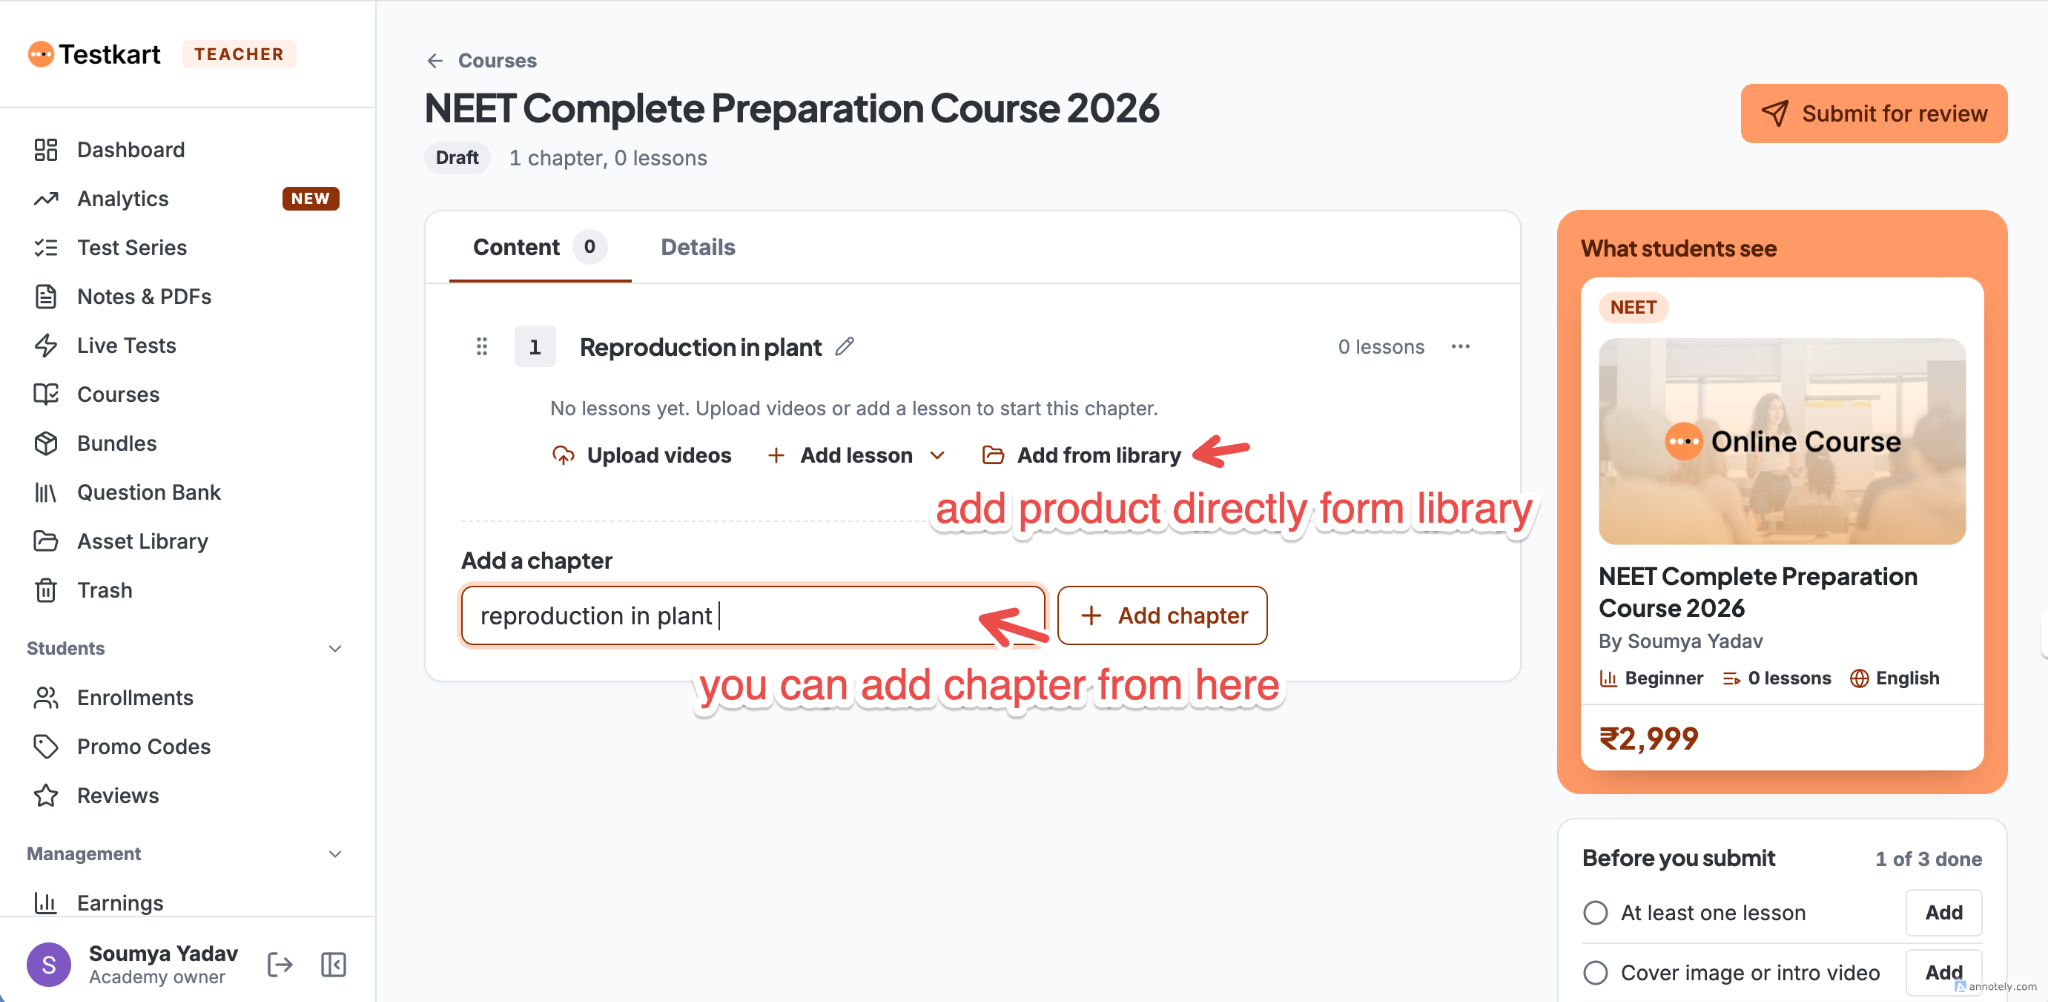
As you build, a "What students see" panel on the right shows a live preview of how your course card will look to students.
Set Price, Level, and Exam Tags
Switch to the Details tab and scroll to Price and audience, where you'll set:
Price — toggle between Free and Paid.
Level — Beginner, Intermediate, or Advanced.
Language — the language your course is taught in.
Subject — a text field, for example "NEET."
Multiple Exam Tagging.
Under Exams (optional), you're no longer limited to a single exam. Add every exam your course is relevant to for example, both NEET UG and ISC Class 12 and mark one as the Primary exam. Your course will appear on the page for every exam you've tagged, but the primary one is what's shown on your course cards. This is useful when the same content genuinely applies to more than one exam or student group, instead of forcing you to pick just one.
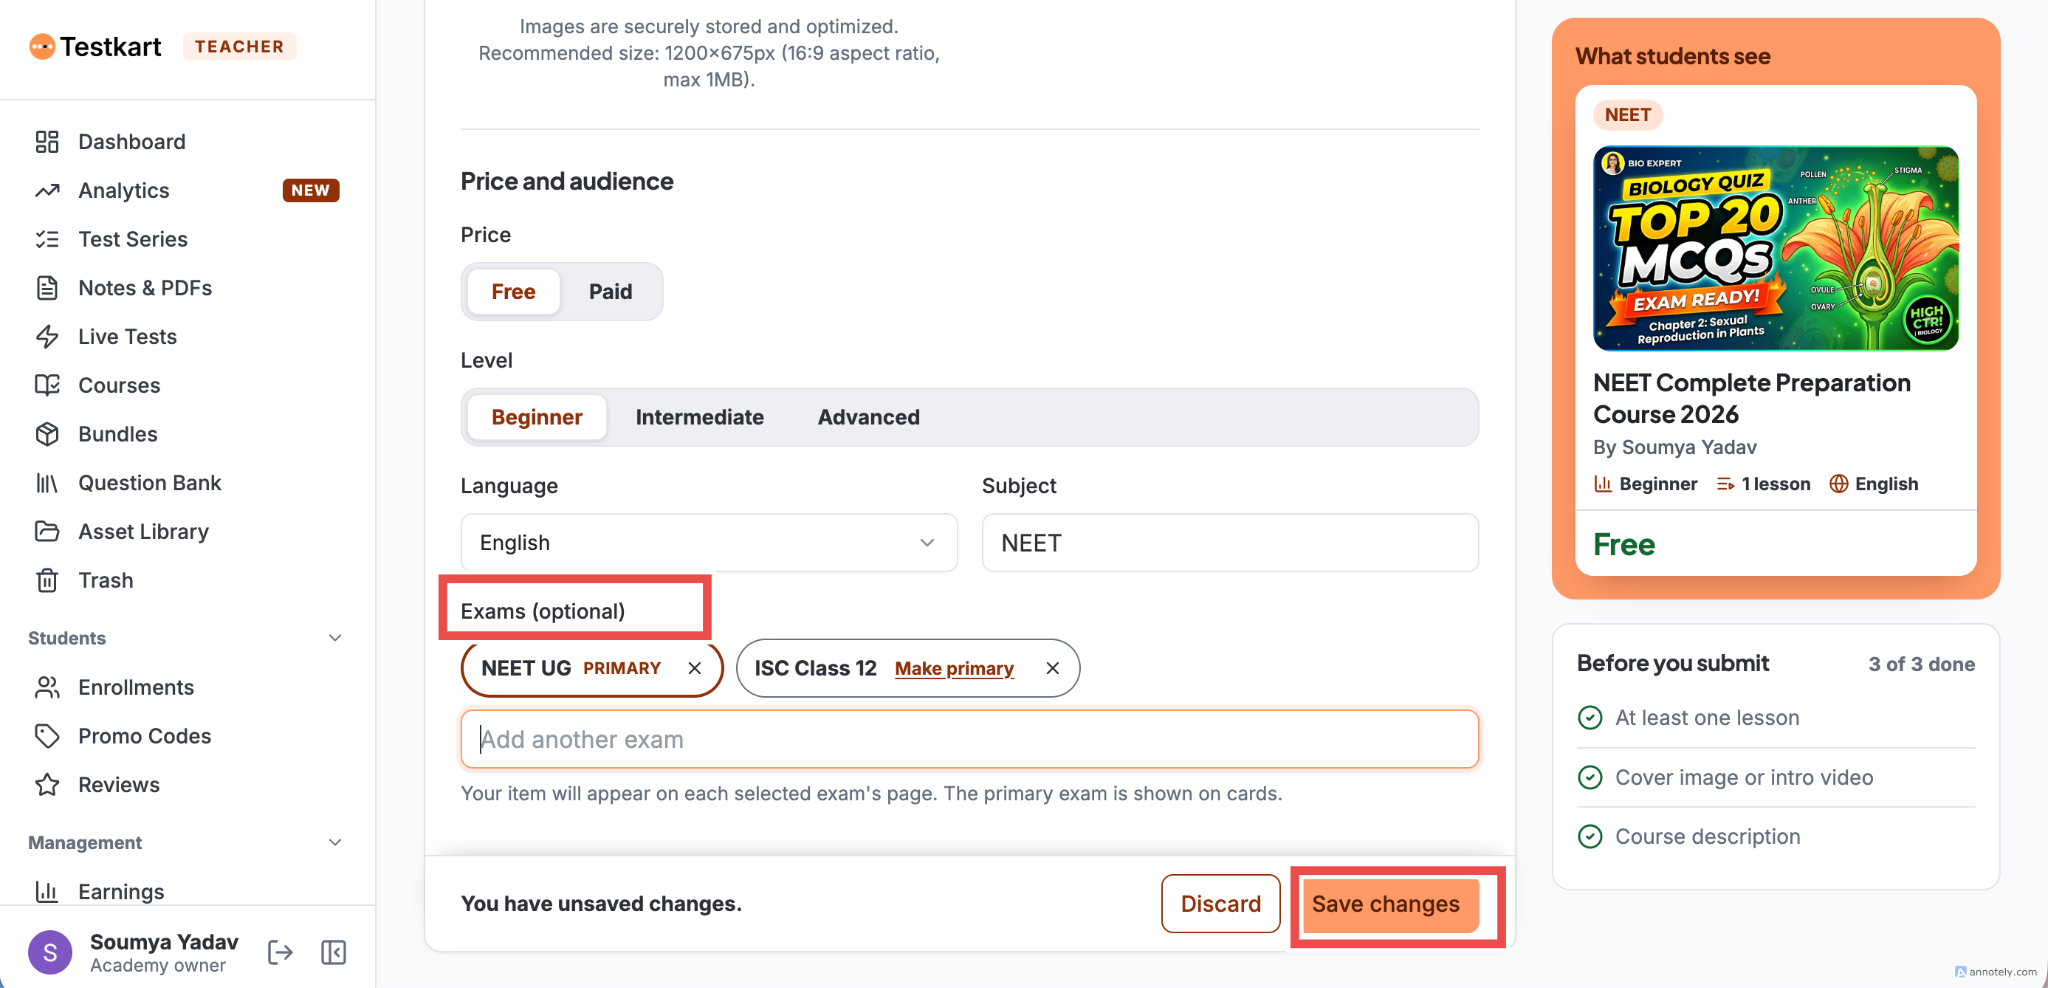
Don't forget to click Save changes whenever you see an "unsaved changes" notice at the bottom of the page.
Complete the Checklist and Submit
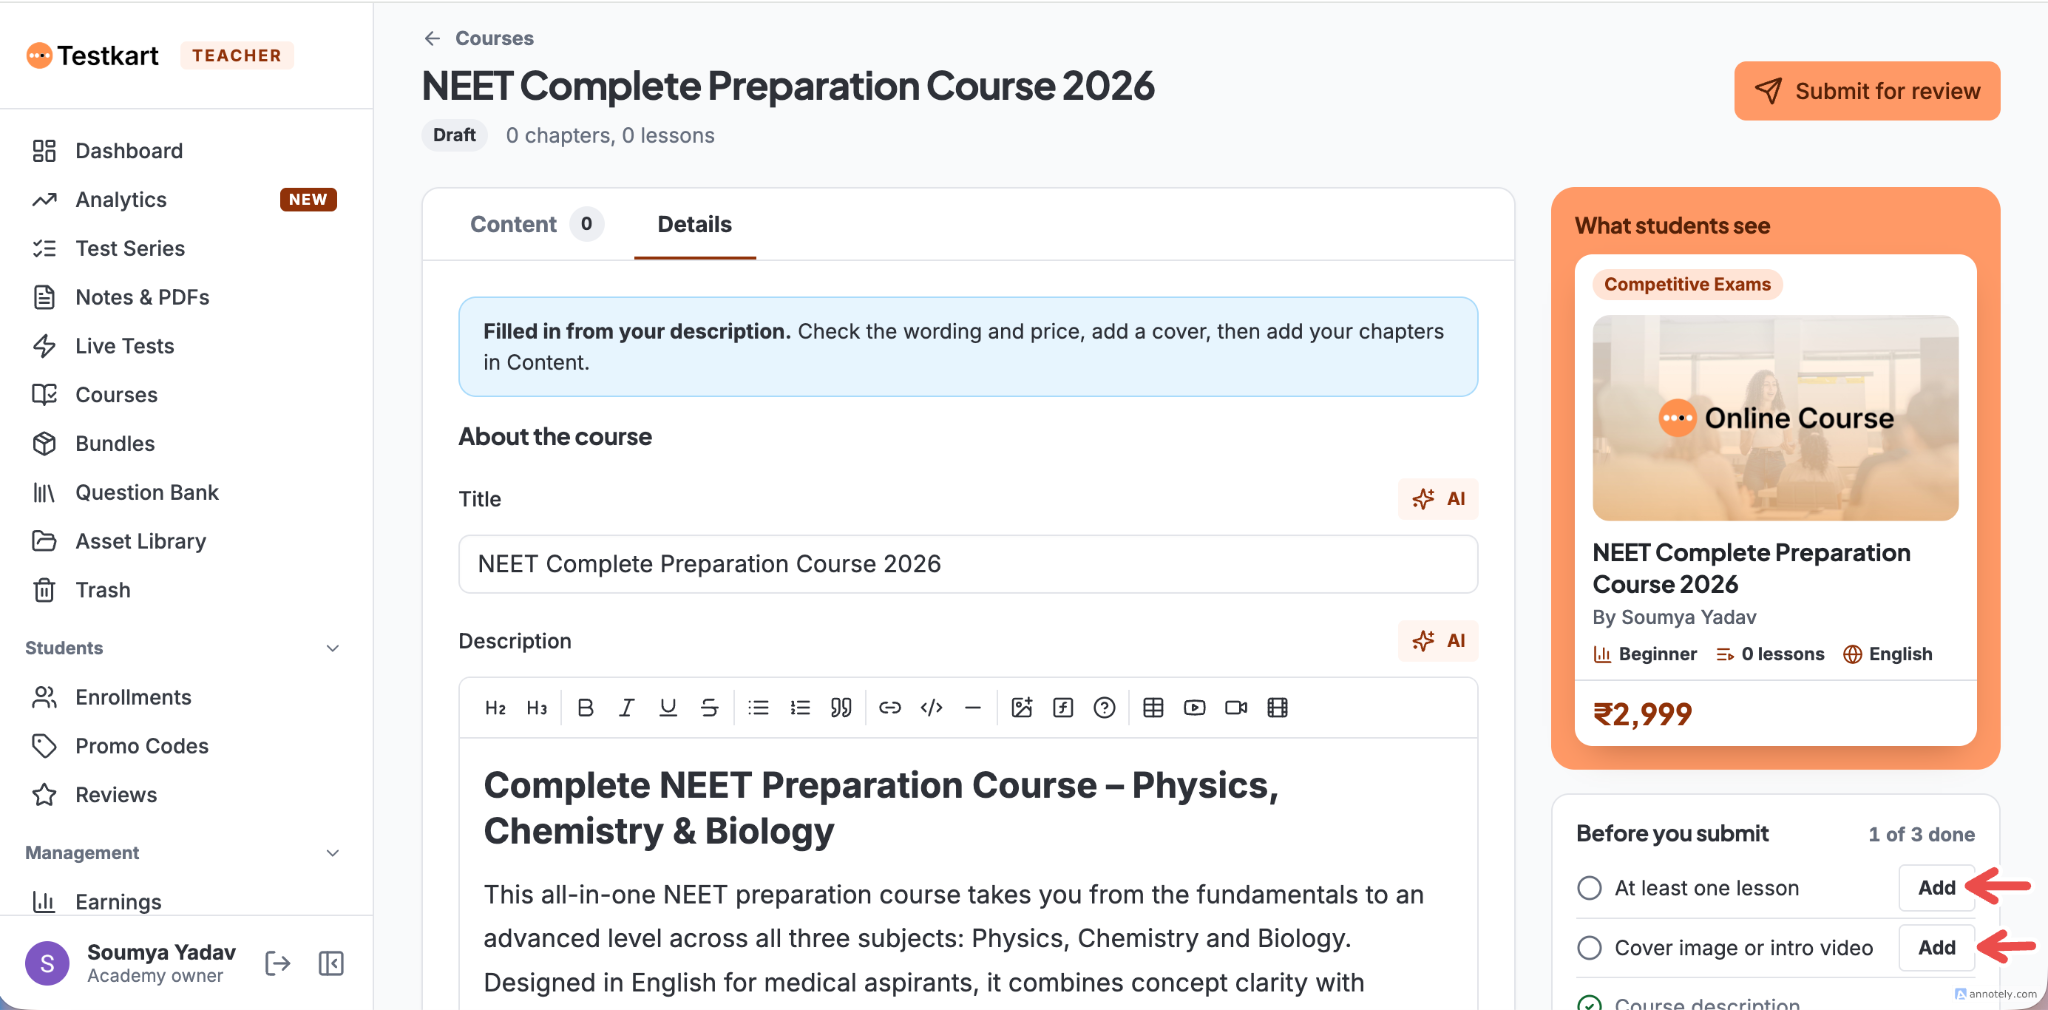
As you build your course, a "Before you submit" checklist on the right tracks your progress typically requiring at least one lesson, a cover image or intro video, and a course description before you can submit. Each item shows an Add button if it's still missing.
Once all items are checked off, click Submit for review in the top-right corner.
After Submitting
Once submitted, your course status changes to In review, and the button in the top-right changes to Take back from review. If you spot something you want to fix before Testkart's team reviews it, click this button a confirmation window explains that the course leaves the review queue and goes back to draft, with nothing deleted, so you can edit it and resubmit whenever you're ready.
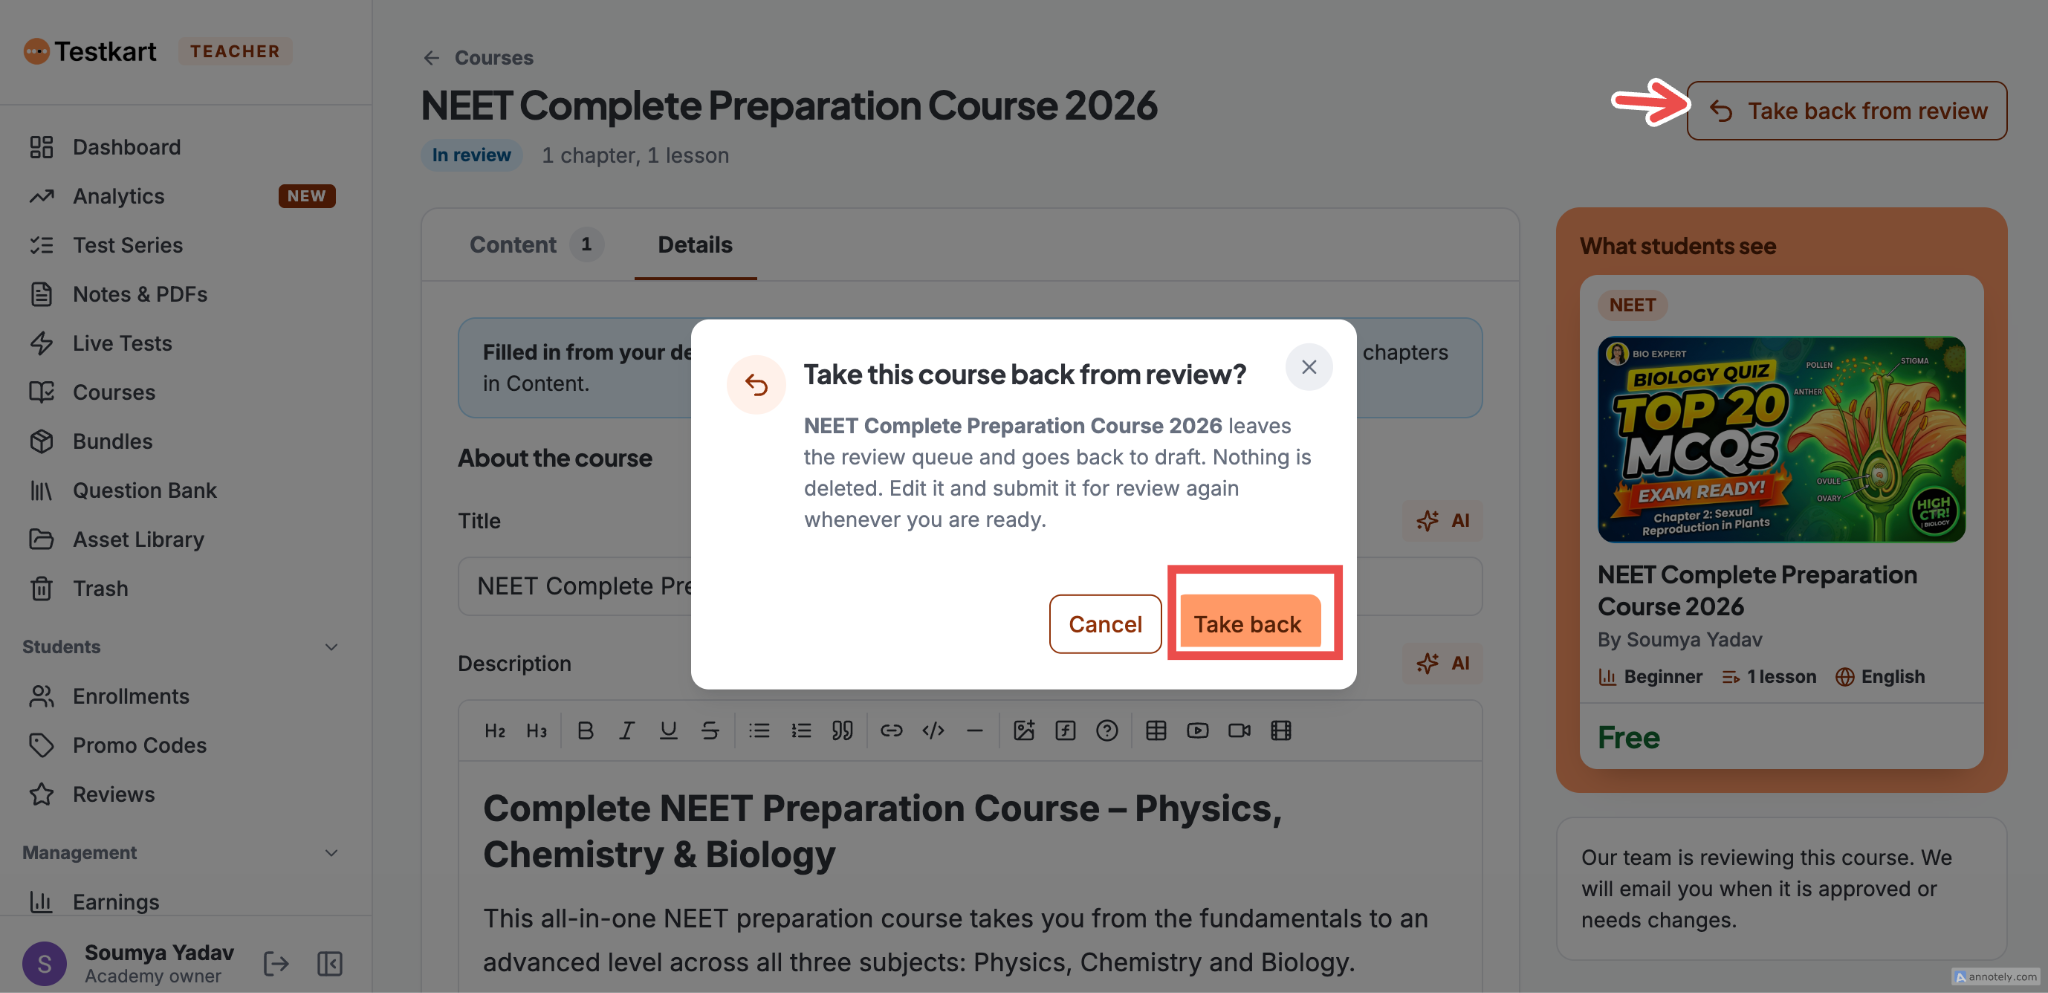
Once approved, your course moves to the Published tab and becomes visible to students.
Frequently Asked Questions
Can I tag my course to more than one exam?
Yes. Add as many relevant exams as you like under Exams (optional), and mark whichever one you want shown on your course cards as the Primary exam. Your course will still appear on every tagged exam's page.
What's the difference between uploading a lesson and using "Add from library"? Uploading adds a brand-new file to that lesson. Add from library lets you reuse a file you've already uploaded elsewhere on Testkart, without uploading it again.
What lesson types can I add to a chapter?
Video, PDF, Text, or Quiz.
Can I edit my course after submitting it for review?
Not while it's in review but you can click Take back from review to pull it back to draft, make your changes, and resubmit it.
Do I need to use the AI prompt to create a course?
No. Click "I'll fill the details myself" on the course-creation screen to skip straight to a blank form instead.